Friday, January 15, 2010

New site

Hi,
We have moved our site to
Here!

This will allow us to have better layout and control. I hope you come take a look!
Michelle

Sunday, January 10, 2010

3 Color Print

Below are some pics of a 3 color image I just did. It didn’t require any real registration basically I just laid the three images over each other and printed them.

The first pic shows a printout of how I wanted them laid out and the colors I wanted to use. At first I had the black camera at the top but it looked too heavy up there so I moved them around till I liked what I saw and printed it out.

Next I printed black images of each camera on Ink Jet transparencies. I then laid them out on the YUDU in their positions and made note where they were in relation to each other. I then burned each screen I was going to use placing each positive in its noted position as I went.

I printed each one starting with the darkest one, that’s the second pic I had several platens lined up and I did all the black SLRs to start with. I removed that screen and washed it clean of ink while I let the black ink dry.

I then printed the red TLR, the third pic, finally the yellow View camera, the fourth pic. All these prints are made on lightweight duck and will be mounted on sign board.

The last pic shows back ground colors I airbrushed on the duck to provide some contrast for the images, The back ground colors are transparent light blue and transparent grey. I did 2 pulls of yellow ink, after the first pull I raised the screen and hit the ink with a hair drier the pulled a second coat of yellow.

As I said earlier there’s no real registration to this image, in time I will tackle that. Meanwhile I’ll have fun doing this.

Cya, Al

Photobucket

Photobucket

Photobucket

Photobucket

Labels: ,

Saturday, January 9, 2010

Yudu mix it up!

Hey everyone I thought I would share a print that I did all by myself. Of course I used one of al’s already burned screens but the camera looks awesome and at least I printed it myself :D.
Photobucket
As you can see I've got a nice baby blue ink color. I knew I wanted blue but I didn't want to do the blue yudo ink that we had so I thought I'd go ahead and mix my own. I put a nice size bead of both the white yudo ink and the blue on a little throw away plate we had and used a little spatula to mix it up. Then I used the spatula to smear the ink above the image and it was ready to go.

The hardest part of doing this is making sure you have enough of the ink mixed. I always need more than I think I do. This time it wasn't really a problem because I was only lighting up the blue but I want to start making my own colors and that’s where I'm going to have to make sure I have enough.


I also wanted to try out something that Michelle has been doing a lot of lately, printing two colors on an image. This time I mixed some red ink with a little of the white to tone it down and put it onto the screen with the blue.

yudu site
I really like the way the colors mix.

So I’ve got a lot of ideas for a new project with my own image next time and can’t wait to start testing it out. Now I only have to learn how to burn my own screen and I’m set :).

-Marie

Labels: ,

Yudu vintage paper

I love vintage designs. When I saw this image on at www.percyandbloom.com/the-vintage-moth.com I really wanted to make a journal cover.

Check out the download images available at the Vintage Moth for personal use. Abagail Mooney finds vintage images and provides free downloads. She also has some beautiful images for sale.

Al sized the image for me in Photoshop because it was very tiny and we wanted to retain as much of the image as possible. To resize, go to image sizing. In the drop down menu make sure to check both boxes for constrain proportions and resample image. Go to the document size area and click on the width dropdown menu and choose precent. Change the width to 110% and resize. Continue this process until image is the size you want. Al repeated the process 15 times at least, but it kept the image from being pixelated. The resampling adds new pixels rather than just making pixels bigger.

We burned on the same screen as one of Al's projects and used 6 minute exposure time to keep the detail.

I used Yudu gunmetal as my base color for several prints. I then added a bit of yellow for a few prints and then added red.I scanned these images to try and get the best detail. There is a beautiful metalic shine that really isn't visible in these pictures.

I plan on making booklet journals with our deep throat stapler to take to work to use for notes. I may print some text using our printer to further personalize my journal. It was a very fun, easy and satisfying project for today.

It is getting easier to flood the screen with ink and pull the ink. For the first time I didn't pull so hard that I gooped up the image.

I hope you are having fun screen printing!

This image has a little red added:

Photobucket

This image has a little of the yellow:

Photobucket

This is Yudu gunmetal:
Photobucket

Labels: , , , ,

Thursday, January 7, 2010

Quick Yudu hints and tips 2

Photobucket


Here are some tips that may help:

1. To get more detail in your designs, reduce the time that you expose the screen.
We have found that fine lines show up much better after we tried this suggestion
from http://www.yuduforums.com

2. When printing an image and flooding the screen with too much ink, use paper
towels to clean excess ink and be able to continue printing without washing
screen.

3. You can get a more even coverage of ink on your project by upgrading to a
Yudu squeegee pro or a professional squeegee.

4. Make sure to use a cheaper less sticky packing tape or blue painters tape to
avoid damaging your screen.

5. We have two different labeled sponges for screen care, one for ink removal and
one marked for removing emulsion.


Missed the first hints and tips? click here!

Labels: , , ,

Wednesday, January 6, 2010

Special offer from Permaset Ink

If you would like to try Permaset ink yourself they are offering our readers a 10% discount at the checkout.


To redeem your coupon you can just type in ‘yudu’ at checkout.
www.buypermasetinks.com


Want to know more?

Can it be set in the dryer?

Labels:

Tuesday, January 5, 2010

Mixing Yudu colors-3 color experiment

I have wanted to try more than one color on my Yudu, but I am not quite ready for dealing with registration marks. My solution was to try laying down three colors on the screen at one time. I knew from what others had done that the colors may mix,but I like that effect.

I chose duct cloth to screen on because I think my design would make interesting fabric. I laid down blue to represent the sky, brown to the right near the horses head and a little red in between. It is very hard to see in the photo, despite many attempts, but there is a nice subtle color change between the blue brown and red.

You can see that the red was too heavy on the top of one print. Another attempt, I again pressed to hard and the color bled out from the edges. I did get two very nice prints that I may make a coin purse out of in the future.

I am looking forward to doing more experimenting with this method because it was quick and gave a look I really liked!

Michelle
Photobucket

Labels: ,

Low heat set ink- can it be set in the dryer?


I did a little research and found that Permaset has a much lower heat setting temperature than YUDU ink. It can be set at 180 degrees for 2 to 3 min., 140 degrees for 5 to 6 min. and 120 degrees for 8 to 9 min. This means I can heat set tees in our dryer after the ink has thoroughly air dried.

I tested my drier and it get gets up to 153 degrees. So my guess is 4 to 5 min is all we'll need. I did not like the idea of spending a lot of time over my ironing board so I can't wait for my order of Permaset due to come in any day.

We plan on doing a test to compare inks and durability after heat setting when we receive the ink. Stay tuned for the results.

Here are some places that you can buy Permaset ink:


300 ml ((about 10oz) $9.49 1 liter(about 33 0z) $20.79
Estimated $6.95 shipping


A 300ml is about 10oz)$8.37 1 liter is(about 33 0z)$18.37
estimated shipping $7.95

Cya, Al

Labels: , , ,

Monday, January 4, 2010

YUDU and the FLU

I’ve had the Swine Flu for the past 12 days. It has all but stopped me from doing anything on the YUDU. I have managed to print something on one of the better days but for the life of I can’t think of what it is. I also came up with an idea using images of three cameras. The pic will be posted below. Last Friday I did manage to help my wife get started on one of her projects. Yesterday I was feeling pretty good so I thought to myself I’ll do the three cameras project. I even got the material ready for printing. All I needed to do was reclaim 3 screens, coat them with emulsion, burn them and off I go. Alas!!!! That was not to be….. I went to bed about 11 pm. Read my book for about 45 min. Turned out the lights and laid there for about 2 ½ hours. This Flu has aggravated an old back and leg injury’s I got long ago. Got up played an online game for a while and went back to bed at 4 am. I woke up at 9:30 with a blazing headache and I knew this day was lost, I spent most of the day in bed!!! Dang!!!! So much for my project, oh well tomorrow is another day. I guess you can’t YUDU if you have the flu!!!!
Cya, AL

Photobucket

Cya, AL

Why Yudu hate me?

Photobucket
Since, I have started looking up information about the Yudu I have been surprised by some of the hatred that is being expressed towards this handy craft machine.

No one was mad when I bought an acrylic paint set with instruction on how to become a painter. They didn’t yell at me in videos because I bought a book on how to make jewelry. In fact, the last time I bought yarn and a pattern to make a scarf everyone said “what a good idea!”

No one believed that I was going to put all the talented painters, jewelry makers or knitters out of business because I bought materials and instructions!

I love our Yudu because I have always wanted to screen print. I could have used embroidery hoops, made my own screens from reclaimed wood and material and cut freezer paper into my own t-shirt designs-but I didn’t. I like how our Yudu sits in the same space as our scanner used to sit and has the ability to hold the screens we need and provides a stable platform to screen our designs. I didn’t have to use my woeful carpenter skills to make something work.

I may grow and want to try other ways of screen printing in my future; in fact I am sure I will. The Yudu provides me with a good basic start.

So let me enjoy my Yudu. If you are that worried that I am going to put you out of business then maybe you should work on your artistic skills!

Feel free to comment and leave your opinion!

Sunday, January 3, 2010

Easy Platens- Make your own!

I got this idea from a post I read sometime in the past, a gal used corrugated plastic signboard for her platens. Sometimes when you have more ideas than money, as we often do around here, you use what you have. I had a few pieces of heavy cardboard that I use as backing on my easel when airbrushing, it’s the same double ply cardboard that our YUDUs came packed in. I needed several platens for an upcoming project and I been house bound for the last 10 days with the swine flu, so I decided to use the cardboard. We used it to print on some cardstock and it worked nicely. I don’t expect these to last forever but they work in a pinch.
As you can see in the 1st pic below I traced an outline of the YUDU platen, but so far I have only cut it to length. I cut the holes a bit smaller and pushed them down the platen pegs so as to make tight fit. Also you need to notch the top where the screen holder/frame hinges are.
Photobucket

The 2nd pic shows how we printed card stock. Rather than use adhesive on cardboard (my guess is that some of the cardboard would come up with the card stock or some of the cardstock would stay stuck to the cardboard), I used blue painters tape to line up the stock where it needed to be and taped the corners down.
Photobucket
The 3rd pic shows a piece of light weight duck that I will be printing on soonish.

Photobucket
Cya, Al

Labels:

Saturday, January 2, 2010

Where we shopped...Liquid Emulsion

We have started using liquid emulsion and are really happy with the results. We chose Speedball Diazo photo emulsion because of the ease of use. We purchased a kit that included 7oz photo emulsion, 7oz photo emulsion remover and 2oz of sensitizer.

Here are the prices and places we found:

http://www.dickblick.com
Speedball Diazo photo emulsion kit for $19.13 and $6.95 in shipping.

http://www.artsupply.com
DIAZO Photo Emulsion Kit for $19.52 kit and $9.62 in shipping

http://www.misterart.com
diazo photo emulsion kit Item # 3554559 $22.31

http://www.amazon.com
Speedball Diazo Photo Emulsion Kit for Screen Printing $20.96 and $8.19 shipping

We chose Dick Blick and we have used our kit to cover 3 screens and think we have at least 3 to 4 more screens to cover. It has been mixed for two weeks and makes a nice sharp image. Even with shipping we are paying less than $4.00 per screen.

It was very easy to use.

Michelle

Labels:

Laying down Yudu ink- New project part 3

Time to print! I have chosen chocolate brown Yudu ink for my first design.

I started to lay down my bead of ink above my image. It seemed like there was more than enough ink after two passes but Al told me to keep going! By the time I finished adding the ink it seemed like I had way too much ink on my screen. I was sure it was going to push through the screen and ruin my paper.

Next, I lifted the screen slightly and pulled the squeegee across to flood my design with ink. Then, I set down the screen onto the paper and used the squeegee to pull ink across the screen again.

I lifted the screen and a perfect sharp image had printed on my card stock. I felt a real sense of satisfaction. I loved this image and printed it on green, white and beige cardstock.
Photobucket

Flushed with success, I continued with my next image. I flooded the screen pulled across the image and this is what I saw.

Photobucket
What happened! I had used too much pressure and too sharp of an angle with the squeegee and the ink came out under the edges and coated the underside of the screen. Now what? We used paper towels and gently wiped the underside of the screen until it was clean, then we reflooded the image. The next pass provided a pretty good image. I was controlling the pressure better and the angle of my squeegee.

Photobucket
Sometimes, I lifted the screen and the paper did not have any ink at all! I had to add additional ink and flood the screen again to continue. This is what it would look like when I didn't have enough ink.


I loved the experience and think that the first design is a keeper. I think I would like to see it printed on material. I have a much better idea of what I like and have a better feel for holding the squeegee. I am screen printing!

Photobucket

Labels: ,

Friday, January 1, 2010

You can do Yudu Liquid Emulsion -New project part 2

The first 4 emulsion sheets we received with our Yudu went fast. With three of us in the house designing images we knew we needed to find a less expensive option fast!
Al did research and we had already decided to go with liquid emulsion by the time I got to my first screen.

I had read horror stories about liquid emulsion, and being the messy crafter that I am, was sure that a disaster was in the making. Al set me up at the kitchen counter with the scoop coater that he had made out of aluminum angle and newspapers on the counter.
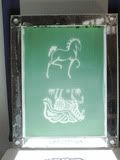
We carefully poured in the emulsion to the scoop. It surprisingly did not smell very strong at all and was a green color. We turned off lights, and kept direct sunlight from screen but we did not need to coat in darkroom conditions.

Starting a half inch from the bottom of the screen, tip scoop coater so that it is as level as possible and all the liquid is evenly touching the screen.

Slowly pull the scoop up the screen continuing to keep the scoop and liquid as level and even as possible.

Start tipping up the scoop as you get closer to the top to allow the emulsion to flow back into the scoop.

It gave a very smooth coat, even though it was my first attempt at liquid emulsion. I added another coat using the same process on the emulsion side. On the well side, I added on coat. It didn’t drip.

I then carefully placed it in the Yudu chamber and dried it for two cycles of 8 minutes and finished it up with the hairdryer.

We reclaimed the liquid emulsion in the scoop and put it back into bottle.

It was so easy and I didn’t end up covered in the emulsion as I thought I would. I am the crafter that is always wearing the paint on arms, shirt and usually the tip of my nose. It was nice to have Al’s help since he is a genius with figuring things out and he had already done a lot of testing on angle, pressure and quantity and knew what to do.
Once dry, I lined up transparencies and placed screen on top with emulsion side down. We exposed the screen 8 minutes since I did not have very detailed images. I pulled out the screen and I could see the image in a light yellow. At our kitchen sink, I gently washed off the unexposed emulsion with cold water and a sponge. I was surprised to see how sharp the image came out! We dried screen thoroughly with 3 cycles of the Yudu and then a short time with the hair- dryer.
Photobucket


Michelle

Squeegee Back Stop

When changing either tees, cards and paper my biggest fear was the squeegee sliding off the screen when lifting the screen frame. I found that placing the squeegee off to the side on an old plate was a waste of movement and ink. So I thought the pros have a squeegee rest right on their machine, why can’t we have the same thing.
I found a piece of 1” X 1” aluminum angle and taped it to the back as you can see in the pics below. I could have used 2 sided tape but I felt that masking tape would add friction and help hold the squeegee in place.
The last pic shows that you can open the screen frame almost all the way and the squeegee stays put.

Cya, Al

PhotobucketPhotobucket


Photobucket

Photobucket

New project today! Part 1

I am going to go step by step through my first paper project. So far, I have prepared two images for my screen and made the transparencies. Here is the image I worked on today.
Photobucket
I also am printing the image of the horse I made last week on the same screen. Here are my transparencies:

Photobucket


Photobucket


My next project is to coat a screen with liquid emulsion!