Friday, January 15, 2010

New site

Hi,
We have moved our site to
Here!

This will allow us to have better layout and control. I hope you come take a look!
Michelle

Sunday, January 10, 2010

3 Color Print

Below are some pics of a 3 color image I just did. It didn’t require any real registration basically I just laid the three images over each other and printed them.

The first pic shows a printout of how I wanted them laid out and the colors I wanted to use. At first I had the black camera at the top but it looked too heavy up there so I moved them around till I liked what I saw and printed it out.

Next I printed black images of each camera on Ink Jet transparencies. I then laid them out on the YUDU in their positions and made note where they were in relation to each other. I then burned each screen I was going to use placing each positive in its noted position as I went.

I printed each one starting with the darkest one, that’s the second pic I had several platens lined up and I did all the black SLRs to start with. I removed that screen and washed it clean of ink while I let the black ink dry.

I then printed the red TLR, the third pic, finally the yellow View camera, the fourth pic. All these prints are made on lightweight duck and will be mounted on sign board.

The last pic shows back ground colors I airbrushed on the duck to provide some contrast for the images, The back ground colors are transparent light blue and transparent grey. I did 2 pulls of yellow ink, after the first pull I raised the screen and hit the ink with a hair drier the pulled a second coat of yellow.

As I said earlier there’s no real registration to this image, in time I will tackle that. Meanwhile I’ll have fun doing this.

Cya, Al

Photobucket

Photobucket

Photobucket

Photobucket

Labels: ,

Saturday, January 9, 2010

Yudu mix it up!

Hey everyone I thought I would share a print that I did all by myself. Of course I used one of al’s already burned screens but the camera looks awesome and at least I printed it myself :D.
Photobucket
As you can see I've got a nice baby blue ink color. I knew I wanted blue but I didn't want to do the blue yudo ink that we had so I thought I'd go ahead and mix my own. I put a nice size bead of both the white yudo ink and the blue on a little throw away plate we had and used a little spatula to mix it up. Then I used the spatula to smear the ink above the image and it was ready to go.

The hardest part of doing this is making sure you have enough of the ink mixed. I always need more than I think I do. This time it wasn't really a problem because I was only lighting up the blue but I want to start making my own colors and that’s where I'm going to have to make sure I have enough.


I also wanted to try out something that Michelle has been doing a lot of lately, printing two colors on an image. This time I mixed some red ink with a little of the white to tone it down and put it onto the screen with the blue.

yudu site
I really like the way the colors mix.

So I’ve got a lot of ideas for a new project with my own image next time and can’t wait to start testing it out. Now I only have to learn how to burn my own screen and I’m set :).

-Marie

Labels: ,

Yudu vintage paper

I love vintage designs. When I saw this image on at www.percyandbloom.com/the-vintage-moth.com I really wanted to make a journal cover.

Check out the download images available at the Vintage Moth for personal use. Abagail Mooney finds vintage images and provides free downloads. She also has some beautiful images for sale.

Al sized the image for me in Photoshop because it was very tiny and we wanted to retain as much of the image as possible. To resize, go to image sizing. In the drop down menu make sure to check both boxes for constrain proportions and resample image. Go to the document size area and click on the width dropdown menu and choose precent. Change the width to 110% and resize. Continue this process until image is the size you want. Al repeated the process 15 times at least, but it kept the image from being pixelated. The resampling adds new pixels rather than just making pixels bigger.

We burned on the same screen as one of Al's projects and used 6 minute exposure time to keep the detail.

I used Yudu gunmetal as my base color for several prints. I then added a bit of yellow for a few prints and then added red.I scanned these images to try and get the best detail. There is a beautiful metalic shine that really isn't visible in these pictures.

I plan on making booklet journals with our deep throat stapler to take to work to use for notes. I may print some text using our printer to further personalize my journal. It was a very fun, easy and satisfying project for today.

It is getting easier to flood the screen with ink and pull the ink. For the first time I didn't pull so hard that I gooped up the image.

I hope you are having fun screen printing!

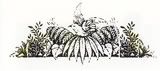
This image has a little red added:

Photobucket

This image has a little of the yellow:

Photobucket

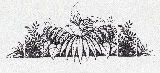
This is Yudu gunmetal:
Photobucket

Labels: , , , ,

Thursday, January 7, 2010

Quick Yudu hints and tips 2

Photobucket


Here are some tips that may help:

1. To get more detail in your designs, reduce the time that you expose the screen.
We have found that fine lines show up much better after we tried this suggestion
from http://www.yuduforums.com

2. When printing an image and flooding the screen with too much ink, use paper
towels to clean excess ink and be able to continue printing without washing
screen.

3. You can get a more even coverage of ink on your project by upgrading to a
Yudu squeegee pro or a professional squeegee.

4. Make sure to use a cheaper less sticky packing tape or blue painters tape to
avoid damaging your screen.

5. We have two different labeled sponges for screen care, one for ink removal and
one marked for removing emulsion.


Missed the first hints and tips? click here!

Labels: , , ,

Wednesday, January 6, 2010

Special offer from Permaset Ink

If you would like to try Permaset ink yourself they are offering our readers a 10% discount at the checkout.


To redeem your coupon you can just type in ‘yudu’ at checkout.
www.buypermasetinks.com


Want to know more?

Can it be set in the dryer?

Labels:

Tuesday, January 5, 2010

Mixing Yudu colors-3 color experiment

I have wanted to try more than one color on my Yudu, but I am not quite ready for dealing with registration marks. My solution was to try laying down three colors on the screen at one time. I knew from what others had done that the colors may mix,but I like that effect.

I chose duct cloth to screen on because I think my design would make interesting fabric. I laid down blue to represent the sky, brown to the right near the horses head and a little red in between. It is very hard to see in the photo, despite many attempts, but there is a nice subtle color change between the blue brown and red.

You can see that the red was too heavy on the top of one print. Another attempt, I again pressed to hard and the color bled out from the edges. I did get two very nice prints that I may make a coin purse out of in the future.

I am looking forward to doing more experimenting with this method because it was quick and gave a look I really liked!

Michelle
Photobucket

Labels: ,