How we started with YUDU
My wife and daughter saw the YUDU infomercial on TV. I knew that Marie is interested in screen printing so I thought let’s do some research on the net and see what we come up with.
The next day we ordered the same kit on the infomercial from COSTCO but for $60 cheaper. Five days later it showed up. We unpacked it looked at all the info. Then it just sat for a week!
We knew we had a finite amount of stuff and replacement emulsion sheets were going to be expensive. So we didn’t just want to burn screens willy-nilly.
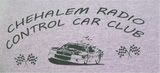
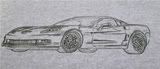
Finally, I came up with a logo for the RC club I belong to and I found a picture of a car that I like. I got on Photoshop and made positives of each.
Next, I put the emulsion sheet on a 110 screen. For the first time doing it, I didn't think it was too hard I just followed the instructions.
When drying the emulsion make sure it is very dry. If you get impatient you will run into problems.
When I did my first screen, the emulsion wasn’t completely dry in the middle. When I pulled the plastic backing, the emulsion stuck to the plastic backing in the middle of the screen and I got a small tear in the emulsion. I stopped what I was doing, dampened the area of the tear and pressed it back into the screen. And put it back into the dryer. This time, I made sure it was dry before I finished pulling off the plastic backing. I washed out the uncured emulsion and I was happy with the results.
After I dried the screen, I pulled out a tee shirt from my drawer and printed my first tee! I had burned two images into my first screen as I wanted to get the most out of those expensive emulsion sheets.
After I taped off the part of the image that I didn’t want to use and edges, I printed the back of my fist tee.
Next, I cleaned the screen and taped off the first image I used and went on to print the front of the tee. Unfortunately, I have already reclaimed the screen so I cannot show how I burned the images into the emulsion. Below is a picture of the front and back of the tee. I set the ink by pressing the tee for about 3 minutes with the iron set on cotton.
We are just beginner screen printers and we have found lots of good info on the net on the subject. This blog is set up to help with your/our journey into the craft and I can see it evolving into something more, but we have to start somewhere.
I have kept notes on each project and found ways to make things a little easier. I have also found ways to cut costs on supplies. These will be posted here in the near future.
Cya then, Al
This is the logo on the back of my first shirt
This is car image on the front.
The next day we ordered the same kit on the infomercial from COSTCO but for $60 cheaper. Five days later it showed up. We unpacked it looked at all the info. Then it just sat for a week!
We knew we had a finite amount of stuff and replacement emulsion sheets were going to be expensive. So we didn’t just want to burn screens willy-nilly.
Finally, I came up with a logo for the RC club I belong to and I found a picture of a car that I like. I got on Photoshop and made positives of each.
Next, I put the emulsion sheet on a 110 screen. For the first time doing it, I didn't think it was too hard I just followed the instructions.
When drying the emulsion make sure it is very dry. If you get impatient you will run into problems.
When I did my first screen, the emulsion wasn’t completely dry in the middle. When I pulled the plastic backing, the emulsion stuck to the plastic backing in the middle of the screen and I got a small tear in the emulsion. I stopped what I was doing, dampened the area of the tear and pressed it back into the screen. And put it back into the dryer. This time, I made sure it was dry before I finished pulling off the plastic backing. I washed out the uncured emulsion and I was happy with the results.
After I dried the screen, I pulled out a tee shirt from my drawer and printed my first tee! I had burned two images into my first screen as I wanted to get the most out of those expensive emulsion sheets.
After I taped off the part of the image that I didn’t want to use and edges, I printed the back of my fist tee.
Next, I cleaned the screen and taped off the first image I used and went on to print the front of the tee. Unfortunately, I have already reclaimed the screen so I cannot show how I burned the images into the emulsion. Below is a picture of the front and back of the tee. I set the ink by pressing the tee for about 3 minutes with the iron set on cotton.
We are just beginner screen printers and we have found lots of good info on the net on the subject. This blog is set up to help with your/our journey into the craft and I can see it evolving into something more, but we have to start somewhere.
I have kept notes on each project and found ways to make things a little easier. I have also found ways to cut costs on supplies. These will be posted here in the near future.
Cya then, Al
This is the logo on the back of my first shirt

This is car image on the front.

Labels: beginner, design, emulsion, instructions, screen, screen printing, t shirt, taping image, tee shirt, yudu
posted by Michelle at
7:18 PM
![]()


0 Comments:
Post a Comment
Subscribe to Post Comments [Atom]
<< Home